
Page All: Viewing All Pages
Page 1
Introduction:
Many articles written on this site and others tell you how important it is to keep information backed up. Right now you are using your computer. Do you feel comfortable if a power surge zaps your hard drive or your hard drive in general decides to die? Even if you answered yes, it is always helpful to inspect a new tool. BackupPC is free and open source. It runs on Linux and there are probably repos to download it for your distribution. Don't let that fool you. BackupPC can save many different workstations including WinXX all the way to anything that runs rsyncd.
What It Is:
BackupPC is a centralized backup solution that can be used and setup on a per client basis. You can have any number of backup clients and the different options can be setup for each individual client. Backups are done intelligently and are stored in pools with or without compression.
What It Is Not:
BackupPC is not polished. That should be known before you jump into configuring it and saying what a horrible tool it is. While the configuration is moderately difficult, the reward more than makes up for it. You will need to do some command line work in a shell. You shouldn't be worried about that since this article will also serve as a guide on how to setup BackupPC for your environment.
BackupPC is not an archival solution. You will need to use a separate program to store on external media. BackupPC does come with a built-in way of handling this task, though.
Gathering Requirements:
The first step you need to do before installing BackupPC is to write down what you think you'll need and what you want to backup. You can't expect to backup 400GB of files onto a 250GB drive. Remember that you should at least have enough backup space for all your clients full backups + 10% for incremental backups. This should give you some leeway. BackupPC does some cool tricks to save space, so you will have more space than you think you may need.
This article assumes you are using some flavor of Ubuntu (or Debian) that has a binary install of BackupPC by a repository. The computer used in this articles contains:
Intel Pentium D 830
Intel 955XBK Motherboard
2GB Crucial DDR2 RAM
Dell Perc5/i RAID Controller*
4x 320GB Seagate SATA drives
Four drive RAID 5 array
The machine is no slouch, but the most important thing is the disks and the controller. Under Linux, I don't recommend the use of fakeraid chipsets such as the ICH* series from Intel (which is present on this motherboard). *The Dell Perc5/i I'm using is a re-badged LSI MegaRAID card. If the card doesn't carry on-board RAM, it probably isn't real RAID. And to anyone that finds this article, I need to use a PCI video card with the Perc5/i to get it to boot.
Your server will need some form of DNS name or static IP. This review assumes that all computers can be setup with static IPs. If you have a different situation, please »post in the forums for help.
Now that you have a baseline of what you will need and what is expected, we can move on to installing BackupPC onto the server.
Installation:
This guide assumes that the server is located at 192.168.1.4. Each place you see this IP, feel free to change it to suit your needs.
Linux was fairly unfriendly about new program installation in the past. Not so with repository installations. If you are using Debian based distributions, apt-get is the tool for this. Under Red Hat based distributions, yum is the tool. You can still compile programs from the source, but repository installations take care of dependencies and such by itself. Since the server is running some flavor of Debian (Kubuntu 7.10), we can use apt-get to perform the install. At a prompt type:
sudo apt-get install backuppc
It should ask for your sudo password...
aronschatz@asetest:~$ sudo apt-get install backuppc
[sudo] password for aronschatz:
Now type in your account password to begin the install.
Press y and then enter to begin the installation.

BackupPC will now ask for some configuration options. On the first screen, which web server should BackupPC setup automatically? In this case, apache2 is the best choice. Select that and press enter.

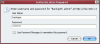
This screen is very important. It lists the initial backuppc password. If you want to change it, it also gives you instructions on how to proceed. We will be changing the password as soon as we are done with the installation. Once you are back at the prompt, open up a browser and navigate to http://192.168.1.4/backuppc . You need to enter "backuppc" as the user name and the password given to you during the installation.
Did you forget the password? We can change it before going forward. At a prompt, type:
sudo htpasswd /etc/backuppc/htpasswd backuppc
It will now ask you for a new password:
aronschatz@asetest:~$ sudo htpasswd /etc/backuppc/htpasswd backuppc
New password:
Enter a new password to use twice.
aronschatz@asetest:~$ sudo htpasswd /etc/backuppc/htpasswd backuppc
New password:
Re-type new password:
Updating password for user backuppc
Once that is complete, you can log into the web site again by using the new password.
Setup:
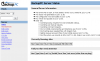

You can now see the basic layout of the web portion of BackupPC. Under the Host configuration, localhost is inserted by default. Since you probably don't want to backup the server to itself, we can remove that now. You can add it again later if you want.

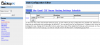
The next stop is the main configuration screen. You can make pretty much all changes you would need to the base configuration on the web. If you only have a few clients that will be backed up the same way, you don't have to go into the command line configuration at all. Each option is explained in detail in the manual included with the program. You should read it through to understand how to setup the program for your exact needs. We can get by using the default configs. By default, the path for the backups is /var/lib/backuppc . You are free to change that if you wish. Make sure you change the "TopDir" configuration option and change the home directory of the backuppc user in /etc/passwd as well.
The default schedule for backups is one weekly full backup and six daily incremental backups. This gives you a retention time of about a week with a daily snapshot of each day in the previous week. This should be fine for most people.

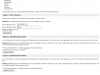
We will now add a host on the host configuration screen. I've added a client called 'asewebdns' to the server. Now this is a DNS name of the client PC. We need to make sure that the server can resolve this address. The best way is to place the IP address of the client in the hosts files of the server. If the client PC's IP address is 192.168.1.115 and the name is "asewebdns" the entry in the /etc/hosts file would look like
192.168.1.115 asewebdns
To insert this into the hosts file, you can type:
sudo vi /etc/hosts
Your file may currently look like this:
127.0.0.1 localhost
127.0.1.1 asetest
And then has some IPv6 information after. You want to navigate down to the blank line after the 127.x.x.x address and add 192.168.1.115 asewebdns. You need to know how to use vi(m) for this or another text editor. You could even open the file as root in a graphical text editor and accomplish the same thing.
The file should look somewhat like this:
127.0.0.1 localhost
127.0.1.1 asetest
192.168.1.115 asewebdns
And you can try to ping the client PC by name and it should work.
Excellent. Now we can move on to the transfer settings of the client PC.
Introduction:
Many articles written on this site and others tell you how important it is to keep information backed up. Right now you are using your computer. Do you feel comfortable if a power surge zaps your hard drive or your hard drive in general decides to die? Even if you answered yes, it is always helpful to inspect a new tool. BackupPC is free and open source. It runs on Linux and there are probably repos to download it for your distribution. Don't let that fool you. BackupPC can save many different workstations including WinXX all the way to anything that runs rsyncd.
What It Is:
BackupPC is a centralized backup solution that can be used and setup on a per client basis. You can have any number of backup clients and the different options can be setup for each individual client. Backups are done intelligently and are stored in pools with or without compression.
What It Is Not:
BackupPC is not polished. That should be known before you jump into configuring it and saying what a horrible tool it is. While the configuration is moderately difficult, the reward more than makes up for it. You will need to do some command line work in a shell. You shouldn't be worried about that since this article will also serve as a guide on how to setup BackupPC for your environment.
BackupPC is not an archival solution. You will need to use a separate program to store on external media. BackupPC does come with a built-in way of handling this task, though.
Gathering Requirements:
The first step you need to do before installing BackupPC is to write down what you think you'll need and what you want to backup. You can't expect to backup 400GB of files onto a 250GB drive. Remember that you should at least have enough backup space for all your clients full backups + 10% for incremental backups. This should give you some leeway. BackupPC does some cool tricks to save space, so you will have more space than you think you may need.
This article assumes you are using some flavor of Ubuntu (or Debian) that has a binary install of BackupPC by a repository. The computer used in this articles contains:
Intel Pentium D 830
Intel 955XBK Motherboard
2GB Crucial DDR2 RAM
Dell Perc5/i RAID Controller*
4x 320GB Seagate SATA drives
Four drive RAID 5 array
The machine is no slouch, but the most important thing is the disks and the controller. Under Linux, I don't recommend the use of fakeraid chipsets such as the ICH* series from Intel (which is present on this motherboard). *The Dell Perc5/i I'm using is a re-badged LSI MegaRAID card. If the card doesn't carry on-board RAM, it probably isn't real RAID. And to anyone that finds this article, I need to use a PCI video card with the Perc5/i to get it to boot.
Your server will need some form of DNS name or static IP. This review assumes that all computers can be setup with static IPs. If you have a different situation, please »post in the forums for help.
Now that you have a baseline of what you will need and what is expected, we can move on to installing BackupPC onto the server.
Installation:
This guide assumes that the server is located at 192.168.1.4. Each place you see this IP, feel free to change it to suit your needs.
Linux was fairly unfriendly about new program installation in the past. Not so with repository installations. If you are using Debian based distributions, apt-get is the tool for this. Under Red Hat based distributions, yum is the tool. You can still compile programs from the source, but repository installations take care of dependencies and such by itself. Since the server is running some flavor of Debian (Kubuntu 7.10), we can use apt-get to perform the install. At a prompt type:
sudo apt-get install backuppc
It should ask for your sudo password...
aronschatz@asetest:~$ sudo apt-get install backuppc
[sudo] password for aronschatz:
Now type in your account password to begin the install.
Code
Reading package lists... Done
Building dependency tree
Reading state information... Done
The following extra packages will be installed:
apache2 apache2-mpm-worker apache2-utils apache2.2-common exim4 exim4-base
exim4-config exim4-daemon-light libapr1 libaprutil1 libarchive-zip-perl
libcompress-raw-zlib-perl libcompress-zlib-perl libdb4.3 libfile-rsyncp-perl
libio-compress-base-perl libio-compress-zlib-perl libpcre3 libperl5.8 libpq5
perl perl-base perl-modules perl-suid samba-common smbclient
Suggested packages:
apache2-doc par2 mail-reader eximon4 exim4-doc-html exim4-doc-info
gnutls-bin openssl libmail-spf-query-perl libterm-readline-gnu-perl
libterm-readline-perl-perl smbfs
Recommended packages:
mailx perl-doc
The following NEW packages will be installed:
apache2 apache2-mpm-worker apache2-utils apache2.2-common backuppc exim4
exim4-base exim4-config exim4-daemon-light libapr1 libaprutil1
libarchive-zip-perl libcompress-raw-zlib-perl libcompress-zlib-perl libdb4.3
libfile-rsyncp-perl libio-compress-base-perl libio-compress-zlib-perl
libpcre3 libperl5.8 libpq5 perl-suid samba-common smbclient
The following packages will be upgraded:
perl perl-base perl-modules
3 upgraded, 24 newly installed, 0 to remove and 10 not upgraded.
Need to get 20.2MB of archives.
After unpacking 36.0MB of additional disk space will be used.
Do you want to continue [Y/n]?
Press y and then enter to begin the installation.
BackupPC will now ask for some configuration options. On the first screen, which web server should BackupPC setup automatically? In this case, apache2 is the best choice. Select that and press enter.
This screen is very important. It lists the initial backuppc password. If you want to change it, it also gives you instructions on how to proceed. We will be changing the password as soon as we are done with the installation. Once you are back at the prompt, open up a browser and navigate to http://192.168.1.4/backuppc . You need to enter "backuppc" as the user name and the password given to you during the installation.
Did you forget the password? We can change it before going forward. At a prompt, type:
sudo htpasswd /etc/backuppc/htpasswd backuppc
It will now ask you for a new password:
aronschatz@asetest:~$ sudo htpasswd /etc/backuppc/htpasswd backuppc
New password:
Enter a new password to use twice.
aronschatz@asetest:~$ sudo htpasswd /etc/backuppc/htpasswd backuppc
New password:
Re-type new password:
Updating password for user backuppc
Once that is complete, you can log into the web site again by using the new password.
Setup:
You can now see the basic layout of the web portion of BackupPC. Under the Host configuration, localhost is inserted by default. Since you probably don't want to backup the server to itself, we can remove that now. You can add it again later if you want.
The next stop is the main configuration screen. You can make pretty much all changes you would need to the base configuration on the web. If you only have a few clients that will be backed up the same way, you don't have to go into the command line configuration at all. Each option is explained in detail in the manual included with the program. You should read it through to understand how to setup the program for your exact needs. We can get by using the default configs. By default, the path for the backups is /var/lib/backuppc . You are free to change that if you wish. Make sure you change the "TopDir" configuration option and change the home directory of the backuppc user in /etc/passwd as well.
The default schedule for backups is one weekly full backup and six daily incremental backups. This gives you a retention time of about a week with a daily snapshot of each day in the previous week. This should be fine for most people.
We will now add a host on the host configuration screen. I've added a client called 'asewebdns' to the server. Now this is a DNS name of the client PC. We need to make sure that the server can resolve this address. The best way is to place the IP address of the client in the hosts files of the server. If the client PC's IP address is 192.168.1.115 and the name is "asewebdns" the entry in the /etc/hosts file would look like
192.168.1.115 asewebdns
To insert this into the hosts file, you can type:
sudo vi /etc/hosts
Your file may currently look like this:
127.0.0.1 localhost
127.0.1.1 asetest
And then has some IPv6 information after. You want to navigate down to the blank line after the 127.x.x.x address and add 192.168.1.115 asewebdns. You need to know how to use vi(m) for this or another text editor. You could even open the file as root in a graphical text editor and accomplish the same thing.
The file should look somewhat like this:
127.0.0.1 localhost
127.0.1.1 asetest
192.168.1.115 asewebdns
And you can try to ping the client PC by name and it should work.
Code
aronschatz@asetest:/etc/backuppc$ ping asewebdns
PING asewebdns (192.168.1.115) 56(84) bytes of data.
64 bytes from asewebdns (192.168.1.115): icmp_seq=1 ttl=64 time=0.403 ms
64 bytes from asewebdns (192.168.1.115): icmp_seq=2 ttl=64 time=0.317 ms
64 bytes from asewebdns (192.168.1.115): icmp_seq=3 ttl=64 time=0.220 ms
--- asewebdns ping statistics ---
3 packets transmitted, 3 received, 0% packet loss, time 2011ms
rtt min/avg/max/mdev = 0.220/0.313/0.403/0.076 ms
Excellent. Now we can move on to the transfer settings of the client PC.
Page 2
Transfer Settings:
There are a few ways to transfer data to the BackupPC server and which you use for each client depends on what the clients has installed. If the client is a Windows based PC, using smb (Samba) is most likely the easiest choice. For Unix-like operating systems, you can use rsync or rsyncd depending if you are running a rsync server on the client or not. Each configuration will be touched upon. We will now be using the command line to perform these tasks.
BackupPC has a global configuration file and then can have configurations for each host it backs up. The directory /etc/backuppc/ contains all the configuration files. If you want a specific host based configuration you need to have a file in that directory for the host. We will add an "asewebdns.pl" file into that directory for the new host to backup.
For each example the client PC's username to log in as will be "<username>" without the quotes. Password will be "<password>".
Rsync:
The rsync method is the best choice for Linux or Unix type PCs. As long as the client PC runs SSH, you can select this option. There is some setup involved such as exchanging SSH keys. This is a once time process. Using SSH keys is very secure as long as your server remains secure. If your server keys are compromised, so are the boxes.
The config file for this setup looks like this:
The first line says to use the rsync transfer type. The second line is a hint to tell where the rsync executable lies on the client PC. The third holds the command to backup the PC and the fourth for restoring. What you will need to edit is the <username> fields and possibly the last line which holds the path to backup. This path must be readable by the username. Since the boxes I'm backing up are primarily one user, I only back that account up. You should use root for backing up the entire PC and make the share name "/" for everything. The backup command basically says to use SSH with some switches to log in as <username> at the host's IP address with the command passed for rsync. Fairly straight forward.
Now we need to setup the client PC to handle this request without asking to log-on. You need to first be logged in as the backuppc user. At a prompt, type:
sudo su backuppc
This will bring you to (probably) a sh shell. Type 'bash' to get to a bash prompt. You'll want to use the directory for backuppc's home. Type "cd ~" at the prompt. Now you want to generate a rsa key from ssh. Type:
ssh-keygen -t rsa
Which will look like this:
Accept the defaults and press enter for everything. Now we want to copy the id_rsa file you just made onto the client PC. We also need to exchange public keys which we can do in one step. Type:
scp /var/lib/backuppc/.ssh/id_rsa.pub <username>@<clientpc>:/home/<username>/sshkey.server.rsa (Ex: scp /var/lib/backuppc/.ssh/id_rsa aron@asewebdns:/home/aron/sshkey.server.rsa)
The scp program runs off of ssh and it will ask you to verify the authenticity of the client. Accept and enter your password for the client machine. When the file has been copied, you need to ssh into the client machine. Type:
ssh <username>@<clientpc> (Ex: ssh aron@asewebdns)
Now the client PC will just ask for your password. You should now be at a bash prompt. Type:
cat ~/sshkey.server.rsa >> ~/.ssh/authorized_keys2
That command took the server's key and added it to the client PC's authorized key list to enable passwordless logins for that specific username. You should now delete the key. Type:
rm ~/sshkey.server.rsa
Type "exit" to get off the client PC. Type "exit" again to log out of the backuppc user on the server. Type "exit" again to completely log off. You are done with the command line portion. Now all you need to do is check that the backup will be successful. Go to the web interface and start a backup. It should now work normally. Congratulations. You setup BackupPC for rsync!
Rsyncd:
This type of transfer assumes that there is a rsync daemon running on the client PC. This type of setup might be a rsync server that you want to backup. This case is trivially easy. The file for the config will look like:
Really, no extra setup is required since the client computer already has an rsync server running. You'll want to modify the share name and the user and password lines. Notice how the share name config option is the same as the previous type of transfer.
Smb:
This transfer type uses Samba which is perfect for Windows clients. You can use the default administrative share to grab the files off of a Windows PC as long as you have an administrator log-in and password. I'll use backup/backup for that purpose now. The file looks like:
You may not know what that "C$" sharename means. A share with a dollar sign after it means hidden in the Windows world. This special share is always enabled and basically shares out all the partitions by name. There is will special shares for each partition. If you have a "D" partition, expect a "D$" share. Make sure that file and printer sharing is enabled in the Windows firewall.
That was really all the setup that's needed for the Windows boxes.
Restoration:

Restoring files directly on the client PC is as simple as starting a backup is. On the host selection screen, switch to the client PC you want to restore files for. You have the option of directly restoring files or downloading the backups. I suggest always to download the backups. A direct restore will overwrite whatever is contained on the client PC.

Select the files you want to restore and hit the restore selected files button. This takes you to a screen that will show you the files and how to restore them. From this screen you can select the option you want. You'll probably want to make a zip of them to download. That was easy.
Improvements:
I would like to see BackupPC be able to be controlled fully by the browser. You should be able to setup new host configurations and such all on the web. Another problem is that the current version of BackupPC I was running (3.0.0) doesn't show a transfer status. You just need to wait till a transfer is done. This is a problem. I would like to know how long the backup will take.
Conclusion:
BackupPC is a very handy free and open source tool to use in your home or business. It is robust enough to handle a variety of tasks and simple enough to be setup.You can try BackupPC if you have a Linux distribution by heading over to the Sourceforge page. It beats paying for software that does the same stuff and works on pretty much every platform. Once again, please »post on the forums with any questions or comments you have.
Transfer Settings:
There are a few ways to transfer data to the BackupPC server and which you use for each client depends on what the clients has installed. If the client is a Windows based PC, using smb (Samba) is most likely the easiest choice. For Unix-like operating systems, you can use rsync or rsyncd depending if you are running a rsync server on the client or not. Each configuration will be touched upon. We will now be using the command line to perform these tasks.
BackupPC has a global configuration file and then can have configurations for each host it backs up. The directory /etc/backuppc/ contains all the configuration files. If you want a specific host based configuration you need to have a file in that directory for the host. We will add an "asewebdns.pl" file into that directory for the new host to backup.
For each example the client PC's username to log in as will be "<username>" without the quotes. Password will be "<password>".
Rsync:
The rsync method is the best choice for Linux or Unix type PCs. As long as the client PC runs SSH, you can select this option. There is some setup involved such as exchanging SSH keys. This is a once time process. Using SSH keys is very secure as long as your server remains secure. If your server keys are compromised, so are the boxes.
The config file for this setup looks like this:
Code
$Conf{XferMethod} = 'rsync';
$Conf{RsyncClientPath} = '/usr/bin/rsync';
$Conf{RsyncClientCmd} = '$sshPath -q -x -l <username> $hostIP $rsyncPath $argList+';
$Conf{RsyncClientRestoreCmd} = '$sshPath -q -x -l <username> $hostIP $rsyncPath $argList+';
$Conf{RsyncShareName} = '/home/<username>/';
$Conf{RsyncClientPath} = '/usr/bin/rsync';
$Conf{RsyncClientCmd} = '$sshPath -q -x -l <username> $hostIP $rsyncPath $argList+';
$Conf{RsyncClientRestoreCmd} = '$sshPath -q -x -l <username> $hostIP $rsyncPath $argList+';
$Conf{RsyncShareName} = '/home/<username>/';
The first line says to use the rsync transfer type. The second line is a hint to tell where the rsync executable lies on the client PC. The third holds the command to backup the PC and the fourth for restoring. What you will need to edit is the <username> fields and possibly the last line which holds the path to backup. This path must be readable by the username. Since the boxes I'm backing up are primarily one user, I only back that account up. You should use root for backing up the entire PC and make the share name "/" for everything. The backup command basically says to use SSH with some switches to log in as <username> at the host's IP address with the command passed for rsync. Fairly straight forward.
Now we need to setup the client PC to handle this request without asking to log-on. You need to first be logged in as the backuppc user. At a prompt, type:
sudo su backuppc
This will bring you to (probably) a sh shell. Type 'bash' to get to a bash prompt. You'll want to use the directory for backuppc's home. Type "cd ~" at the prompt. Now you want to generate a rsa key from ssh. Type:
ssh-keygen -t rsa
Which will look like this:
Code
backuppc@asetest:~$ ssh-keygen -t rsa
Generating public/private rsa key pair.
Enter file in which to save the key (/var/lib/backuppc/.ssh/id_rsa):
Created directory '/var/lib/backuppc/.ssh'.
Enter passphrase (empty for no passphrase):
Enter same passphrase again:
Your identification has been saved in /var/lib/backuppc/.ssh/id_rsa.
Your public key has been saved in /var/lib/backuppc/.ssh/id_rsa.pub.
The key fingerprint is:
4b:xx:b4:xx:55:f3:xx:2c:xx:32:49:a5:xx:ea:9b:11 backuppc@asetest
Accept the defaults and press enter for everything. Now we want to copy the id_rsa file you just made onto the client PC. We also need to exchange public keys which we can do in one step. Type:
scp /var/lib/backuppc/.ssh/id_rsa.pub <username>@<clientpc>:/home/<username>/sshkey.server.rsa (Ex: scp /var/lib/backuppc/.ssh/id_rsa aron@asewebdns:/home/aron/sshkey.server.rsa)
The scp program runs off of ssh and it will ask you to verify the authenticity of the client. Accept and enter your password for the client machine. When the file has been copied, you need to ssh into the client machine. Type:
ssh <username>@<clientpc> (Ex: ssh aron@asewebdns)
Now the client PC will just ask for your password. You should now be at a bash prompt. Type:
cat ~/sshkey.server.rsa >> ~/.ssh/authorized_keys2
That command took the server's key and added it to the client PC's authorized key list to enable passwordless logins for that specific username. You should now delete the key. Type:
rm ~/sshkey.server.rsa
Type "exit" to get off the client PC. Type "exit" again to log out of the backuppc user on the server. Type "exit" again to completely log off. You are done with the command line portion. Now all you need to do is check that the backup will be successful. Go to the web interface and start a backup. It should now work normally. Congratulations. You setup BackupPC for rsync!
Rsyncd:
This type of transfer assumes that there is a rsync daemon running on the client PC. This type of setup might be a rsync server that you want to backup. This case is trivially easy. The file for the config will look like:
Code
$Conf{XferMethod} = 'rsyncd';
$Conf{RsyncShareName} = 'backup';
$Conf{RsyncdUserName} = '<username>';
$Conf{RsyncdPasswd} = '<password>';
$Conf{RsyncdAuthRequired} = 1;
$Conf{RsyncShareName} = 'backup';
$Conf{RsyncdUserName} = '<username>';
$Conf{RsyncdPasswd} = '<password>';
$Conf{RsyncdAuthRequired} = 1;
Really, no extra setup is required since the client computer already has an rsync server running. You'll want to modify the share name and the user and password lines. Notice how the share name config option is the same as the previous type of transfer.
Smb:
This transfer type uses Samba which is perfect for Windows clients. You can use the default administrative share to grab the files off of a Windows PC as long as you have an administrator log-in and password. I'll use backup/backup for that purpose now. The file looks like:
Code
$Conf{SmbShareName} = 'C$';
$Conf{SmbShareUserName} = 'backup';
$Conf{SmbSharePasswd} = 'backup';
$Conf{XferMethod} = 'smb';
$Conf{SmbShareUserName} = 'backup';
$Conf{SmbSharePasswd} = 'backup';
$Conf{XferMethod} = 'smb';
You may not know what that "C$" sharename means. A share with a dollar sign after it means hidden in the Windows world. This special share is always enabled and basically shares out all the partitions by name. There is will special shares for each partition. If you have a "D" partition, expect a "D$" share. Make sure that file and printer sharing is enabled in the Windows firewall.
That was really all the setup that's needed for the Windows boxes.
Restoration:
Restoring files directly on the client PC is as simple as starting a backup is. On the host selection screen, switch to the client PC you want to restore files for. You have the option of directly restoring files or downloading the backups. I suggest always to download the backups. A direct restore will overwrite whatever is contained on the client PC.
Select the files you want to restore and hit the restore selected files button. This takes you to a screen that will show you the files and how to restore them. From this screen you can select the option you want. You'll probably want to make a zip of them to download. That was easy.
Improvements:
I would like to see BackupPC be able to be controlled fully by the browser. You should be able to setup new host configurations and such all on the web. Another problem is that the current version of BackupPC I was running (3.0.0) doesn't show a transfer status. You just need to wait till a transfer is done. This is a problem. I would like to know how long the backup will take.
Conclusion:
BackupPC is a very handy free and open source tool to use in your home or business. It is robust enough to handle a variety of tasks and simple enough to be setup.You can try BackupPC if you have a Linux distribution by heading over to the Sourceforge page. It beats paying for software that does the same stuff and works on pretty much every platform. Once again, please »post on the forums with any questions or comments you have.